At our studio, the hum of the wheel and the soft rhythm of clay being shaped are part of the everyday magic. There’s something deeply grounding about sitting down at the wheel—hands coated in mud, good music on, and friends on either side. If you’ve ever wanted to try throwing pottery, or you’re simply curious about what happens behind our studio doors, here’s a glimpse into the beautiful, messy, creative world of throwing clay. Starting with a little knowledge on what “throwing pottery” actually is….
Throwing pottery is the process of shaping clay on a spinning wheel, but we also like to think of it as an artful meditation. One that invites you to be present, to listen to your hands, and to let go of perfection. Each bowl, mug, or vase starts with the same humble lump of clay. What it becomes is up to you, or sometimes up to the clay 😉
What It Feels Like at the Wheel….
We always tell new students: it’s okay to wobble, jiggle, and wiggle. Everyone does. That’s part of the fun.
Throwing pottery isn’t about instant perfection — it’s about learning to let go, laugh through the wonky moments, and celebrate the little victories (like finally getting your clay sort of centered — which, yes, is a huge deal). The wheel might feel a bit intimidating at first, especially when it starts spinning and your hands don’t know what to do. But give it a few tries, and you’ll find your rhythm.
Throwing pottery is a full-body experience. Your arms are engaged, your brain is focused, your hands are learning to listen — and your legs might even be bracing a bit harder than you expected. It’s a balance between pressure and patience, motion and stillness. You’re not forcing the clay into shape; you’re moving with it. Guiding it.
And there’s this moment — usually after a few wobbly starts — when the clay clicks. You feel it. Something begins to take shape under your fingertips. Maybe it’s a little lopsided bowl or a cup with some serious character. Doesn’t matter. It’s yours. And that sense of “Whoa, I made this with my own two hands” never really gets old.
One of our students once said, “It felt like I was trying to center my entire life, not just the clay.” Honestly? Relatable.
A Simple Breakdown of the Process….
Throwing pottery can seem like a mystery when you’re watching from the outside — just a spinning lump of clay that magically turns into a mug? But once you break it down, it’s a series of simple steps, each one with its own purpose (and its own challenges). Here’s how the magic happens:
Step 1: Wedging
Before you even touch the wheel, you’ll start with something that feels a bit like a warm-up. Wedging is the process of prepping your clay to play on the wheel in the “easiest way” possible — and yes, we’re saying that with finger quotes. It’s basically kneading, like bread dough… just stiffer, messier, and slightly less delicious.
So why do we do it? Because even one sneaky air bubble can turn your masterpiece into a cracked mess or a kiln casualty (explosions happen — it’s not a myth). Wedging gets rid of those bubbles, evens out the moisture, and helps you connect with the clay before the wheel ever starts spinning.
It’s grounding, a little repetitive, kind of meditative… and if we’re being honest, it feels really good to smack a lump of clay onto the table a few times. Call it functional stress relief.
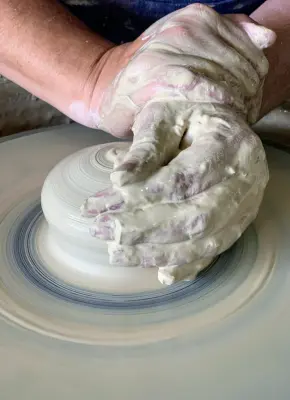
Step 2: Centering
This. Is. The. One.
Ask any pottery student what the hardest part of throwing pottery is, and 9 out of 10 will say centering. The other one is lying.
Centering is the part where you slam your perfectly wedged clay onto the wheel and try to get it spinning evenly under your hands. Sounds simple, right? Just anchor your elbows, apply pressure, and boom — you’ve got a centered lump. Except… nope.
In reality, your clay will probably wiggle, fight back, and do everything except what you want it to. It’s a weird mix of strength and softness. You have to push firmly while still staying relaxed. (Yeah, good luck with that the first time.)
But here’s the thing: when you finally do get it — when that clay stops wobbling and spins like a smooth little planet under your palms — it feels incredible. It’s like the moment your brain and body sync up and go, “Ohhh, I get it now.” From there, the rest of throwing pottery starts to make more sense.
Some students even say centering feels like a form of meditation. Others describe it as fighting with wet cement. Either way, it’s a skill that takes time, muscle memory, and a little stubbornness — but once you nail it, you’ll want to center clay over and over just to prove you can.
Step 3: Opening & Pulling
Once your clay is centered (which may or may not have taken several attempts and a minor identity crisis), it’s time to open it up.
This is where you press down into the middle of your centered clay to create the opening — kind of like digging a tiny well with your thumbs. From there, you’ll begin pulling the walls upward, gently stretching the clay inch by inch until it starts to look like… something. A bowl? A mug? A very determined ashtray? Honestly, anything goes at this point.
This part of throwing pottery takes finesse, patience, and the ability to keep breathing while everything feels like it’s about to collapse. Spoiler: sometimes it does. That’s normal. The wheel can be humbling like that. But when you do get it right and those walls rise evenly? It’s the best feeling. Like, cancel-your-plans-and-sign-up-for-another-class level satisfying.
This step also helps define the overall size of your piece. Want something tall and skinny? Wider and rounder? Slightly lopsided but charming? It all starts here — with a little pressure, a steady pull, and a healthy dose of “let’s see what happens.”
Side note: If your first piece mysteriously turns out the perfect size for a shot of tequila… you’re not alone. Happens all the time.
Step 4: Shaping
Now that your clay is centered and you’ve opened it up without total collapse (high five), it’s time to shape it into whatever masterpiece you had in mind — or, more realistically, whatever it decides to become.
This is one of the most satisfying parts of throwing pottery: gently guiding your piece into form while the wheel spins and your hands do the real work. Maybe you’re going for a classic cup, a curvy planter, or something in between. You’ll use a mix of tools, fingertips, and intuition — all while trying not to accidentally turn your mug into a salad bowl.
It’s not about forcing the clay into submission; it’s about learning to feel what it wants to do and nudging it in the right direction. And sure, that sounds a little woo-woo, but anyone who’s spent time throwing pottery knows — the clay always has opinions.
The best part? No two pieces ever turn out the same. Even if you try to make an identical match, each one ends up with its own shape, personality, and little quirks. One’s a bit taller. One leans to the left like it’s tired of your expectations. One has a mysterious dent you’re now calling a “thumb rest.” That unpredictability? That’s the charm.
Pro tip: Embrace the quirks. The “perfect” pot is boring. The one that’s slightly off-center with a story behind it? Way better.
Step 5: Trimming
After a few days of drying — just long enough for you to forget what your piece even looked like — it’s time to return and clean things up. This stage is called trimming, and it’s kind of like editing a rough draft. The messy edges, the chunky bottom, the little blobs of “oops” — all fair game now.
When you’re throwing pottery, most of the shaping happens when the clay is soft and wet. But trimming happens when your piece has firmed up to what’s called leather-hard — not too soft, not too dry. Just right for carving away the excess and adding the final touches that make it look intentional.
This is where you’ll use trimming tools to refine the shape, smooth the bottom, and define the foot of your piece (that’s the little ring at the base that keeps your mug from looking like it melted in the kiln). You might also clean up the rim, even out the walls, or just admire how far it’s come since Step 1.
Trimming feels quieter and slower than the rest of the process — less chaos, more control. It’s where a wobbly little clay lump officially starts looking like a real ceramic piece you could actually use… or gift to someone who’ll pretend it’s the coolest thing they’ve ever seen.
Bonus: This is the part where most students say, “Wait… it actually looks good?” Yes. Yes it does.
Step 6: Glazing
After your piece has gone through its first round in the kiln — a process called bisque firing — it’s time for the grand finale: glazing.
Glazing is kind of like painting, except instead of using regular paint, you’re brushing on a strange, chalky liquid that somehow turns into shiny glass after another 2,000°F+ bake in the kiln. Trust the process. It works.
This is the part of throwing pottery where you get to play with color, texture, and creativity. Want something earthy and matte? Go for it. Bold and glossy? Also great. You can dip, brush, layer, or even drizzle glazes to get totally different effects. (And yes, sometimes it looks nothing like what you expected. Surprise!)
Once your piece is glazed, it goes back into the kiln for a second, higher-temperature firing. A few days later, you’ll open the studio cabinet and see your finished work — shiny, smooth, and officially usable. That’s the moment most students hold up their piece and say, “Okay, this looks legit.” And it does.
Glazing brings everything full circle. From a humble lump of clay to a functional piece of pottery, this is where your hours of centering, shaping, and trimming finally pay off. It’s what makes the whole process of throwing pottery feel real — and honestly, kind of magical.
Also: Yes, you can eat or drink out of it. Yes, it’s food-safe. Yes, it’s dishwasher safe. (Unless you went rogue with glitter glaze. Then… maybe not.)
Why We Love It
In a world that’s always rushing — screens, deadlines, errands, repeat — throwing pottery slows everything down. It brings you back to the present moment. It gets your hands dirty (in the best way), challenges your patience, and gives you permission to make something imperfect… on purpose.
Around here, it’s never been about creating flawless pots. It’s about the laughs when your bowl flops, the quiet focus when you finally center that clay, and the proud “I made this” moment when you hold your finished piece for the first time. Throwing pottery connects you to something ancient, tactile, and real — and reminds you that messes can be beautiful too.
Whether you’re joining us for a one-time adult pottery class or you’re looking for a fun way to get your kids into something creative with our kids pottery classes, we’re so glad you found your way to the wheel. Your piece might wobble. Your glaze might surprise you. But we promise: it’ll be worth it.
Want to explore how throwing pottery fits into the creative energy of The Artist Outpost? Read more here.
Curious to try it for throwing pottery yourself? Come throw with us — first-timers welcome, perfection not required.